Friday 17 February 2023

Burda Style 03-2020-121 Dress for Engagement photos

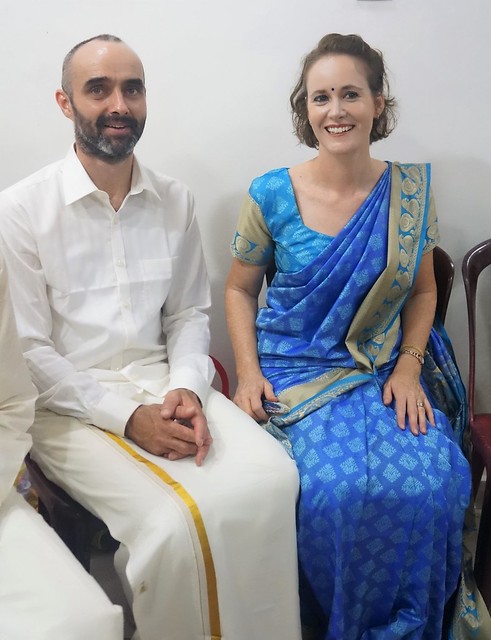
 This is a very exciting post for me. DD2 is engaged to Future Son-In-Law, who now that he is almost a member of our family, I consider to be fair game for my sewing blog. (I did ask permission, feeling that the general feeling of well being floating around at this particular life event was a very good opportunity for me to be gained this concession). He has actually appeared before in a headless fashion, but this is much better. I introduce FSIL, here providing handsome background for the dress that DD2 wore for engagement photos which is my excuse for putting family information on this this sewing blog. See how happy they look? We are all extremely pleased.

From a sewing point of view, I have been granted a fabulous opportunity to indulge in sewing with beautiful fabrics, as my daughter has also kindly asked me to make her wedding dress, and of course there are other important people who are also likely to need a fancy dress for this occasion. I'm sure you can imagine how thrilled I am.

Okay, back to the engagement dress. This was great fun to make, and does not deserve to be overshadowed by visions of playing with silk and lace for months on end.

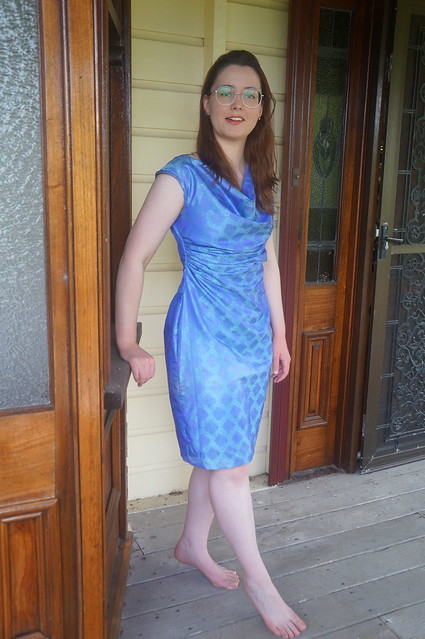
The pattern is Burda Style 03-2020-121, and the fabric is a cotton sateen with elastine that my daughter kindly bought me from Spotlight in March 2020 as a sewing treat due to my entry-to-Australia- from- New Zealand- in- March 2020 home isolation. Unfortunately I had to spend most of this period trying to keep our business operating, whilst not able to attend it,  but the thoughtfulness of the gift still gives me warm fuzzies, so it was lovely to use the fabric as a gift for such a special occasion.


This pattern is the retro style feature from the magazine, and as you can see, we have chosen to make the dress without the sash. It was fairly straightforward to make, although the sweetheart bodice of the pattern is very high, just below the collarbones, and I have redrawn the front bodice for a more modern placement. I have never had to lower a neckline in a Burda pattern before.  My other alterations, for fitting, were to shorten the bodice, take in the waist, add a little to the booty. All of these are normal alterations for my daughter. I also changed the lower bodice and the skirt pleats to darts, as we found the poochiness of the pleats gave a bulky apperance at the waist. Here is the back of the inside, where you can see that I have also added a kickpleat to the back walking slit.

On looking at the photos, I recall that we also shortenened the sleeves. So maybe it was not quite so straightforward to make as I recall, but with hopeful visions of  new technical challenges ahead of me, this was not too hard to make. I will probably use the pattern again.


I have also added piping to the neckline for a tidy finish and to reduce the possibility of the neckline stretching as the fabric with elastene has this unfortunate tendency. I have also understitched the neckline ffacing to help the neckline sit well.

My daughter tells me that she likes the dress very much, and I am flattered that she chose it to wear for her photograhs.


I am looking forward to more sewing of pretty dresses.

Sunday 27 November 2022

A dress to wear to a wedding, Burda Style 10- 2012-118, or is it BurdaStyle 02-2021-119?

 I am making a Maid of Honour dress for my older daughter. In this modern relaxed Australian wedding each female member of the wedding party is given guidelines by the bride,  rather than detailed instructions or a particular dress to buy/have made. This is very exciting, as I was able to look at hundreds of beautiful fabrics and elegant patterns with the excuse of research to present to my daughter. We just have a colour palette, and the length of the dress as a framework.


This dress here is not the Maid of Honour dress, but it is a stage in the process, and I did make it for my daughter.

Before making the above dress there was some delightful mutual and individual time wasting perusal of many fabrics  and dress photographs on the internet. Eventually I had to stop doing this as my daughter showed me a photograph of a dress that she fancies as a starting point. She apologised that is not the fabric she wants, not in the right colour palette and not the right length for the wedding, and that she didn't want a seam across the front bodice.. This was not displeasing, as my daughter kept saying things like " If I find the right dress I'll just buy it". which is not what a person whom has hardly sewn party clothes for about 2 and 1/2 years now wants to hear.

We thought that we could reproduce the salient aspects with some judicious pattern alteration of  this pattern for a woven knee length dress from Burda Style  10-2012-118, which I have made previously for myself as both a dress and a top.


 The brief from my daughter is to modify the pattern for an extended shoulder, and to make the dress floor length for the wedding, and to possibly  make a bolero.

I was a tiny bit worried that I was being hopelessly out of date here, this being a 10 year old pattern, but  Audrey of SewTawdry posted not so long ago that this pattern is very similar to a 2021 offering, with identical line drawings, so if Burda thinks it is up to date (ish), I am happy. (Audrey's top in plaid is amazing)

Naturally I needed to make a trial version before we cut into precious pricey fabric. Naturally my daughter felt that if I was going to all the trouble of making a trial version, she might as well wear the trial version when she was to attend the wedding of a close friend, as a guest, not in the bridal party.

So here is version 1, in a cocktail wedding guest length, in situ at her friend's wedding.


The fabric is from a sari that I  bought in Sri Lanka several years ago, to wear to a family friend's wedding there. I really enjoyed having the opportunity to wear a sari. The little blouse was made by a  seamstress in Columbo from one end of the sari that is woven with the blouse in mind. It was interesting to see how the seamstress drew the pattern straight on the fabric after taking a few measurements.


I am equally pleased to be able to use the sari to make a pretty dress.

 You can see that my daughter and Ihave chosen the reverse side of the sari to be the outer side of the dress. We thought that the fabric was silk, and it is certainly silky, but after I managed to melt a lot of the warp fibres in ironing, we now feel that it is a poly silk blend. Once I had removed the highly embellished borders from the sari, it was quite narrow, and I used most of the fabric of the sari to cut out the knee length dress. As it frayed immoderately, and is a very thin fabric, I chose to underline with enclosed seams, using a poly cotton imperial batiste, and unfortunately had not already cut extra wide seam allowances to allow for the turn of fabric, so I was quite nervous that I might have made the dress too small, not having enough fabric left to cut out another full dress length panel.


Fortunately this was not the case and I did not even have to let out the seam allowances at the final (and only) fitting. My daughter lives about two and a half thousand kilometres away from me, but was coming to Brisbane ( a mere few hundred kilometres away) the day before the wedding. I was to hem it in Brisbane, so it was just as well that I was planning to do this by hand, as I didn't fancy lugging my machine to the flat shared by our other offspring. 

It may have been finished just before she dashed off to the wedding, sans photographs, which is why you should forgive me for the slightly blurry phone shot taken by another of my daughter's friends who may have been drinking bubbly. I have delayed writing this post until a later visit, when the dress was modelled for sewing blog purposes.

Notes to myself: Add lingerie straps to assist in holding the cowl neckline, and an internal and external stay for the waistline pleats.


Sunday 24 July 2022

Another Birthday dress, and a Sirdar Birthday cardigan. The perils of knitting taking longer than sewing.

 Conveniently, two of my friends have little girls who are 3 months apart in age. Naturally, when I was invited to the younger baby's first birthday party, my thoughts were drawn to the pattern I had recently used for  Miss M . I love reusing a pattern that I have already traced out, it makes me feel smugly efficient.


 However, I was not feeling smugly efficient when I took this photo mere seconds before leaving for the party. I may have sewn the buttons on whilst a passenger in the car. The reason for this was that my thoughts had not instantly flown to this pattern, because the intended present for Miss S was a sweet little cardigan, which mysteriously had not been finished by the day of the party. I blame this timing failure on having to rip back the sleeve due to its strange and disproportionate length. Of course, that was also because I thought I could knit 2 sleeves in 3 evenings after work. I was wrong. But I can mostly sew a little girl's simple pinafore dress in 4 or so hours if everything falls into place.


This dress is also a modification of the pattern (for a romper) Lollipop (Australian Smocking and Embroidery 72). It is clearly much more simple than the dress-for-the- birthday-party that I made for Miss M, but as it was only part of Miss S's gift, and intended for everyday wear, I felt that it was equally appropriate. I made Miss S a winter dress, as her birthday is at the beginning of Autumn, and besides, I had a little remnant of cordoroy that jumped out at me when I opened the door to my fabric closet in a slightly panicky manner. You can see that I made some attempt at fancy touches, it is a birthday gift after all. The front pocket , neckline and armscyes are trimmed with pale pink mini piping and the bodice is lined in the same pink cotton twill. I do like my remnant stash. Unfortunately using up these little pieces of fabric does not encourage me to clean out my fabric scraps, which is the other name for my remnant stash.

I am very lucky, and the mother of Miss S kindly visited me with Miss S wearing her little dress about 3 months after I'd made it. Doesn't she look sweet?


However, you may notice that she also looks tall, which is particularly evident as she dashes out the door whilst having her photo taken. As I had still not finished the cargidan, and I had firm intentions that the two garments be worn as an outfit, I had to do something about the length of the dress.


I finished the cardigan, and visited the family with my gift in tow with an ulterior motive. I  also came with a pink bias bound ruffle which I sewed to the pinafore whilst giving my friend a mini sewing machine foot lesson. She has started sewing for her little one on her grandmother's sewing machine, and I think she is hooked.


The cardigan is made from Baby Bamboo, and the pattern is cardigan C  from the pattern book  346, Baby Bamboo Too

I am quite pleased with the cardigan now that it is finally on the baby.


Friday 15 July 2022

Three times lucky BurdaStyle 06-2020-103/104


Technical Image from BurdaStyle.com

I seem to have a habit of making several dresses from the same pattern, all in a row. Often this is because I have gone to a lot of work with the fitting, but in this case, there wasn't much fitting at all, and the more likely reaon for three different dresses from the same pattern is that I am quite lazy about tracing out new patterns lately. Here are three versions of my current go-to dress, made over the last 12 months.

First up, I made  BurdaStyle 06-2020-104 from a drapy viscose (rayon) print from Spotlight after making a FBA (full bust adjustment) and a square shoulder adjustment as I always need to do. This was my toile, as I didn't have anything plain in a drapy fabric.


It was quite large across the back neckline, and I found the sleeves unappealling at the pattern length, so reduced the length by more than half. As you can see, these are still quite long sleeves for a summer dress.


It is quite pleasing as a wear-around-the- house dress aside from one small issue. I finished the hem sleeves with a rolled hem on my overlocker and have to wrestle with my hem neatness obsession every time I put the dress on.


Next I made a very fancy version from sandwashed silk, shiny side out for the bodice, and matt side out for the sleeves and the skirt. These hems are all conventional machine rolled hems and I much prefer them.

I was very pleased with this frock, which I wore to a wedding, but unfortunately it is now rather oversized, as I have lost weight, so does not look any good on me in its current state. No photographs whilst being worn are available, all the ones from the wedding showing it covered up by my ancient brown velvet coat. It was a winter wedding on a farm and I should have made a dress in boiled wool and worn two pairs of stockings.

 More recently, I made this pattern again in a slightly heavier than handkerchief weight digital printed linen. This version, despite a little scaling down, was still too big, so I added two pleats across the front waistline which I found to be a satisfactory and pleasingly simple correction. I also reduced the sleeve length further. I notice that in neither version is the front bodice seam opening visible. This is quite fiddly to sew neatly, so I may leave it out in future verisons.


I like this pattern very much, having found it a pretty and comfortable dress in three different fabric types,  and am thinking a sleeveless version will work nicely next summer.


Saturday 4 June 2022

Reconstruction: Linen dress not quite as good as the original garment, but much more useful


 Doesn't the Lady Grey Colette coat adaptation look lovely under the Jacaranda in this photo? I was half pleased with myself when I made this (ulp) 11 or so years ago, and I had a very interesting and in retrospect, enjoyable time making it, albiet with some slightly burdensome fitting woes.

However, I have never worn it, other than in the photo shoot. A very poor outcome for some lovely linen fabric and a lot of work. It has languished in my wardrobe, because frankly, it is the wrong type of garment for the subtropical climate where I live. It is too hot for autumn and spring, being fully lined with Imperial batiste,  ridiculously too hot for summer, and not warm enough for our very brief, but chilly, winter mornings and evenings. Despite this, I had great difficulty in setting scissors to it, despite several attempts over the past few years. I become attached to my projects.

2022, I decided, was time to Woman up and do something about this.

Naturally, I stuffed this up fairly spectacularly.


I used an op-shop find pattern, Kwik Sew 2255 as a starting point for the planned transformation from shoulder line princess double breasted coat to princess line frock.

 I had never used this pattern, but for some strange reason, did not make a toile, despite nearly always having to adjust patterns. Instead, maybe thinking that I only needed the general shape of the neckline, I merely traced out the front  and back bodice pattern pieces and merrily chopped away at the front of the coat to approximate the top edges of the front and back bodice pattern. I clearly need to go back to first principles with my sewing, because when I held up the massacred garment to myself, the neckline was unable to cover the salient sections of my bra.

You may have guessed that this experience did not encourage me to go forward with the project. In fact I think the coat  spent more than 3 months lying on my sewing table whilst I moved on to more immediately gratifying projects. 

However, after I'd made a few little smocked baby garments, my not-very-latent smocking addiction was looking for new targets. I thought that a smocked insert would satisfy my embroidery urges, and possibly rescue the garment from the too-depressing-to-finish pile. ( This pile usually finds it way fairly quickly to the rag bag, but the beautiful linen was resisting this move).

The smocking was great fun. I did show some embellishment restraint, and smocked the fabric in the closest shade of DMC stranded embroidery thread that I could find for some pretense at subtlety.

 I then had to work out how to attach these smocked sections to the neckline. 

 I carefully hand basted, then machine stitched the smocked sections to fill in the bodice, serenditously finding that I could slightly gather the top edge using the holding stitches from the pleating to encourage the neckline to sit nicely against the body. This was a little fiddly, but I was pleased with the end result.I then attached the back piece of the dress, and piped the neckline for stability.


Originally I had intended to keep the coat lining, and make a lined dress, but decided that this made the dress too warm to wear. Instead I drafted a deep facing from the original collar of the dress. This facing extends down the entire front of the dress, and I was able to reuse the interfacing from the coat for this purpose. I bound the facing with a constrast bias binding, as there were not enough scraps from the coat to make a self fabric trim.The only trouble with removing the lining is that I was unable to improve the seam finishing for the back seam of the coat, which orginially was pinked, then topstitched. The photograph was taken after I had worn and washed the dress, and some fraying is occurring.

I shortened the sleeves of the dress, mended the unavoidable left over buttonhole from the double breasted coat fastening at the waistline, and found some suitable buttons from my stash.

On starting to make buttonholes I realised that my forward planning skills have become very rusty. The smocked section is thick, mobile, and not suitable for a buttonhole. Oops.

I made a thread loop, oversewn with buttonhole stitch, and this works quite well for fastening the very top of the bodice.

The dress is not as well constructed as the coat, and despite my best intentions I cannot stop noticing the mended waistline buttonhole,  but I feel very comfortable (and thrifty) in this dress and  have already worn it multiple times.


Now I am feeling inspired to make something impractical and frivolous.


Sunday 13 February 2022

First Birthday dress

 This has been a highly enjoyable project. My friend bought some fabric for me, and asked me to make a birthday dress for her beautiful little girl. I may have hinted quite strongly that I would like to do this.


The pattern I used was a conglomeration of the romper Lollipop (Australian Smocking and Embroidery 72) and the dress Serious Fun (Australian Smocking and Embroidery 87). I should probably say that it was a simplification of the two patterns as really, the fabric and the smocking do the talking here. Basically this is a sleeveless square yoke dress with a contrast back button band and hem ruffle. The mini piping at neckline, armscyes and bodice, and the neckline embroidery are my own addition.

The smocking design is a modification of the smocking and embroidery from the Lollipop pattern.


My friend has a terrific eye for colour, but is not experienced in buying fabric. Unfortunately she was sold some rather off grain printed cotton, which required a lot of starch to line up nicely through the pleating tool. I think it turned out quite well despite this wrestling, and the recepient seemed quite comfortable on the day by all reports (Alas, I was in isolation and could not attend the party to view the dress in action, but daughter-the-second took some photographs for me) My daughter cunningly managed to gain the photographs before the consumption of cake and before the water play in the rain and puddles. As I reassured the baby's parents, smocking is very robust and a smocked cotton dress has no trouble going through the washing machine, even if you forget to turn it inside out.


Underneath the dress, there is a pair of ruffly bloomers, made from the white cotton also used for the dress ruffle, but with the ruffles made from the yellow polkadot print, edged with white binding. I modified the overall pattern that I had  used for her previously:  Burda Style 02/2016/141 to make these)  Naturally one should not photograph a young lady's underpinnings in situ, (well, I forgot to photograph them before they were provided to the birthday girl), but I assure you that they look very sweet, and could possibly turn into shorts in their next wearing, which one could photograph with impunity. I will keep an eye out for photo opportunities. Both the dress and the rompers were made for size 1, but as you can see, the dress has a little room for growth, which is an advantage for baby clothes. The romper elastic at the waist had to be shortened by about 5 cm to fit.

technical drawing from Burdastyle.com


I love sewing little girl's clothes.

Thursday 3 February 2022

Smocking revisited


I was asked to make a first birthday dress for our friends'  little girl. It seems that my friends have noticed that there have been a few baby clothes sent their way and that I may be addicted to sewing cute little garments for small people who already have plenty of clothes. Naturally I had sudden delightful visions of something very ruffly, with smocking and maybe embroidery, seeing as I wouldn't have to iron it. The only problem is that it is about 10 years since I last did any significant smocking.


To overcome this issue, I made a practice dress, except it wasn't a dress, because the 10 month old recipient had only just started walking, and a crawling baby tends to have a bit of trouble with a dress, so I made a romper.

I had a lovely time persuing my collection of Australian Smocking and Embroidery magazines, and in consultation with the baby's mother, came up with a combination of patterns:

Issue 87 Serious Fun


and Issue 72 Lollipop


I didn't really like the construction details for the cross over bodice for Serious Fun, and think that the bodice ruffle is both a little too large for a slightly sub size 1 baby (pattern is sizes 1-2) and also a very tight gather, but other than those mild quibbles, find this a pretty and practical garment (admittedly overtrimmed, but I am a bit trim deprived lately, making boring work clothes) . I did use snap tape instead of buttonholes at the crotch seam.


The main fabric is cotton quilting fabric, and the ruffle is a high thread count cotton sheeting. The pattern fabric calls for damask, which is usually a heavier fabric that the sheeting I used, so the ruffle could definitely be a bit shorter without any loss of frilliness. 


My smocking construction skills definitely needed a refresher. See my buckling seam between the smocking and the bodice ? I used to use an iron on tape for this placement, prior to sewing, but didn't have any to hand. I plan to baste a lot for the next one. I told myself firmly not to unpick this as it is a practice garment, and I'd already had to patch up a big slice I put in the front bodice (due to having no more of this fabric to cut out a new one) but it was difficult to resist the urge to re do it. Fortunately this garment does not live at my house and I won't see these sewing glitches glaring at me very often.


I tried to get an action shot, but there was a lot of action. You know the idea that if you can't see it from a galloping horse it doesn't matter ? I hope this applies to the active toddler.


Her walking skills improved dramatically between the start of construction and the finished garment (about 2 weeks). I think I am set for a dress for the birthday party. I am planning to both avoid slashing errors with my constructed dress parts and also to have a much better seam between the smocking and the rest of the garment.